Are you on a voice or video call with others but facing trouble speaking because of a sore throat, a cough, or another obstacle? In such cases, you don’t need to talk. Instead, you are able to use a synthesized voice of yourself through the correct iPhone & iOS version. Let us discuss How to create and Use a Synthesized ‘Personal Voice’ on your iPhone.
Now, you can use the feature to speak various phrases and fully record your voice. Once you complete the recording, you can use the Live Speech option. It enables you to speak what you type via the new synthesized voice. So, the voice will have an artificial & synthetic quality. The aim of this feature is to offer a voice that sounds like your own if you cannot speak for yourself.
Personal Voice is a feature that supports audio calls, FaceTime calls, & specific communication apps. People with an iPhone 12 or later can enjoy the feature only. This feature requires iOS 17 or higher. Besides, creating a personal voice with some specific iPad models featuring iPadOS 17 or higher is possible. You can even create your personal voice with a few specific model Macs, including macOS Sonoma or higher. This feature is really helpful for those who have lost their voice. Let’s dig into this article to learn how to create and use a synthesized ‘personal voice’ on your iPhone.
What is Personal Voice?
This one is a tool that uses ML or machine learning technology to create your voice’s synthesized version. In order to convert text into audio, it works with Live Speech.
About Personal Voice And Privacy:
The design of this feature is done keeping privacy and security in mind. The voice will be encrypted & stored securely on the device. Therefore, users are only able to access this with a Face ID, Touch ID, device passcode, or password. If you share this across devices, iCloud will use end-to-end encryption to store your Personal Voice.
You can use it with Live Speech & third-party apps like augmentative & alternative communication (AAC) apps. In order to control app access to this feature, you need to go to Settings or System Settings. Then, you need to go to Accessibility. Next, you should move to Personal Voice. In addition, your granted third-party apps will not be able to capture speech from Personal Voice.
The feature can be used in order to create a voice that sounds like you are using your own voice for your personal, non-commercial use. Your Legacy Contact will not be able to access your Personal Voice.
Prerequisites To Create Personal Voice On iPhone:
Before you use Personal Voice to create a digital replica of your voice, it is necessary to meet the given criteria.
- Operating System: The OS has to be iOS 17, iPadOS 17, and macOS Sonoma or later.
- Devices: The devices need to be — iPhone 12 or later, iPad Air (5th generation), iPad Pro 12.9-inch (5th generation) or later versions, iPad Pro 11-inch (3rd generation) or later versions, and Mac with Apple silicon.
- Ensure that you set up a Face ID, Touch ID, or a Passcode.
How To Create And Use A Synthesized ‘Personal Voice’ On Your iPhone:
-
Update Your iPhone:
In order to ensure that your device is running iOS 17 or higher, your first task is to navigate to Settings. Then, you need to select General. Next, you should tap Software Updates. After that, you can see whether your device is updated, or prompted to download & install the latest update.
-
Set Up Personal Voice On Your iPhone:
You should first navigate to Settings on your iPhone. Then, you have to select Accessibility. You have to swipe down the page to the section for Speech. Next, you need to tap the option for Personal Voice. The upcoming screen comes with two settings. If you are willing to share the recording that you made on your iPhone with other iCloud-enabled devices, you need to turn on the switch for Share Across Devices ( like Mac or iPad). If you want apps that support the feature to request access, you have to enable the switch for Allow Apps to Request to Use.
-
Find A Time And Place To Record The Phrases:
You need to tap the option Create a Personal Voice. When you see the next screen, you will see an explanation of how the process works. You should know that to let the process work, you need to record 150 different phrases, and it may take around fifteen minutes. Ensure that you have enough patience and time to complete this. Make sure that you do not panic. Instead, begin recording phrases, stop & pick up where you left off at another time. Now, you should tap on Continue. Next, you can see the upcoming screen giving you advice to find a quiet place, speak in a natural way, and take your time. At last, you need to tap on Continue.
-
Test Your Environment:
Now, your task is to confirm or change the assigned name to your voice. Next, you need to tap Continue. Once you see the next screen, you will need to tap on the red record button. Then, your task is to say the phrase which is displayed on the screen. You get to know if the conditions are ideal for recording from the next screen. If this is the case, you should tap Continue to proceed.
-
Record Your Phrases:
Hence, you need to tap on the record button. Then, you should say the phrase that you see on the screen. Now, you see the next phrase appearing automatically. You have to continue with every new phrase. Once you make a mistake with any phrase, you need to go back by tapping the Rewind button at the top. Finally, you have to tap the record button, and then you should try again.
This recording process directs you to every new phrase by default, and you do not need to tap the record button continuously. Do you want to continue with the next phrase by stopping after every phrase and tapping the record button? If so, you need to tap the Continuous Recording option at the bottom. Then, you have to change this to Stop at Each Phrase. Otherwise, you may keep on recording.
-
Stop Recording:
You should tap on Done at the top to take a break. Once you are ready to resume, ensure that you can see the screen for your personal voice. Now, your job is to tap on Continue Recording. In order to record the next phrase, your task is to tap the record button. A countdown will inform you of the number of phrases left to record for you.
-
Finish The Recording:
You need to keep on recording every phrase until all of these are finished. Finally, the screen informs you that the recording is done. Then, you have to tap on Continue.
-
Prepare Your Personal Voice:
When you go to the next screen, you will have to create your personal voice. It tells you that you can generate the voice only when your phone is locked & charging. Now, you need to tap on OK. After that, the tool begins preparing the personal voice. It displays a percentage countdown. Remember that the process may take a while. Therefore, you should set aside a time when you do not have to use your phone.
-
Allow The Preparation Process To Finish:
In order to see the percentage countdown, you have to check the phone periodically. If the countdown is not appearing anymore, ensure that your device is completely ready to use.
How To Use Your Personal Voice:
-
Add Your Personal Voice To Live Speech:
As soon as you set up Personal Voice, you can add this to the collection of voices in Live Speech and use it thereafter. Hence, you need to navigate to Settings. Then, go to Accessibility. Thereafter, you should head toward Live Speech (also in the Speech section). Then, your task is to toggle on Live Speech. After that, you have to tap under Voices on the same page. When you are on that page, your task is to tap under Voices. Then, you need to choose your Personal Voice at the top. In order to select this from the list, you have to tap your Personal Voice.
-
Enable Live Speech On A FaceTime Or Call:
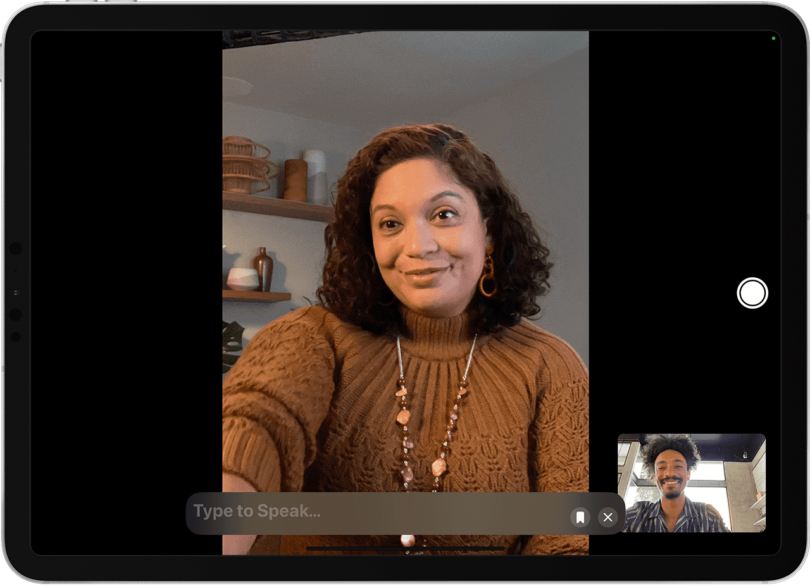
In order to use the feature, you have to enable Live Speech. And to do so, you have to triple-click the side button. Then, you can see a window at the bottom of the screen. It prompts you to type a message. After pressing enter, you get to hear your voice generated by AI. You can test this anytime. Even when you are on a phone call or FaceTime call, you can do it.
-
Use Live Speech:
Once you select your Personal Voice, you can put it to be used. You are able to use the feature when you are on a FaceTime call, voice call, any communication app, or in-person conversation.
- First, your task is to enable Live Speech.
- After that, you need to triple-click on the right-side lock/wake button.
- If you see many options on the screen, you have to choose Live Speech.
- Next, you need to select from the phrases you like by tapping on Phrases.
- If you wish, you are also capable of typing a phrase.
- Then, your iPhone says the phrase out loud in your digital voice. You can find they’re a bit robotic, though.
How to Turn off Live Speech:
If you do not need to use the feature, you should turn it off. In this case, your job is to head toward Settings. Then, you need to select Accessibility. After that, you have to tap Live Speech. Finally, your job is to turn off its switch.
How To Manage Your Personal Voice:
If you are willing to manage your personal voice on your device, you should follow these steps.
- First, you need to navigate to Settings.
- Then, you have to select Accessibility.
- Now, you need to tap on Personal Voice.
- If you want, you can create multiple voices.
- In order to record & create a new voice, your task is to tap the link for Create a Personal Voice. Then, you need to follow the steps to record & create a new voice.
- Then, you need to tap on the personal voice, which is already present. Now, you are able to change the name. Then, you can export the file which is used to create the voice. Or you can delete it completely.
How To Add Or Remove Favorite Phrases:
You know now the process of creating and using Personal Voice using live speech on the iPhone. Let’s learn how to add or remove the favorite phrases from the list next.
- Your first task is to open Settings.
- Then, you need to tap on Accessibility.
- After that, your task is to scroll down to open Live Speech.
- Now, your job is to choose your Favorite Phrases.
- You should tap the + icon on the screen’s top-right portion.
- Then, your task is to enter the phrase that you are willing to add to the list. Hence, you are able to add multiple phrases. Once you press the side button three times, you can see this. If you want, you can delete them too.
- Now, you have to tap on the Edit button at the screen’s bottom-left section.
- Then, you need to select the red (-) beside the phrase which you are willing to delete.
- In order to remove this, you have to tap on Delete.
You need to repeat steps continuously in order to add phrases and remove them.
How To Delete Personal Voice:
It is easy to delete the Personal Voice. But you should be aware of the fact that as soon as you delete the voice, it will not be anymore. You need to go through the entire process from scratch.
- Your first task is to open Settings.
- Then, you need to scroll down below. After that, you have to tap on Accessibility.
- Now, your job is to tap the Personal Voice.
- After choosing the voice you are willing to delete, you have to tap on this.
- Finally, you need to tap on Delete.
Thus, you can delete your Personal Voice from your iPhone immediately.
The Bottom Line:
Haven’t you tried this feature yet? Then, why are you waiting? Just try this one of the coolest features by Apple. Although the voice may sound a bit robotic, it will be close to your original voice. You are capable of adding many examples of your Personal Voice as well as you are able to create this in various languages, if you are multilingual. For further queries or confusion, do ask us via comments.
Frequently Asked Questions
How do you make your own voice on your iPhone?
Your first job is to navigate to Settings. Then, move to Accessibility and Personal Voice. After that, your task is to tap on the option Create a Personal Voice. Now, you should follow the series of prompts. Now, you need to tap on Done when you want to pause the recording session. In order to resume, your task is to tap Continue Recording.
Can you add voices to the iPhone?
Yes, you can add voices to the iPhone. In order to do so, your first task is to open the Settings app. Then, you need to tap Accessibility. After that, you have to tap Personal Voice. At last, your task is to tap Create a Personal Voice.
Can you create your own voice?
Yes, you can clone a voice with artificial intelligence technology. People often call this process “voice cloning” or “speech synthesis”.


