
Introduction to How to Drive More Traffic Using Google Image Search
Understanding the Power of Google Image Search
In this digital age, images attract and engage online audiences. With the rise of visual content, Google Image Search has become an essential tool for driving website traffic. But how exactly does it work, and why should you care about it? Let us shed more light on this prodigitalweb.com blog post on How to Drive More Traffic Using Google Image Search.
What is Google Image Search?
Google Image Search is a search service created by Google in 2001. It allows users to search the web for image content. Introduced in 2001, it has become a powerful feature, indexing millions of images and making them easily accessible to users worldwide.
Why Google Image Search Matters for Traffic
Optimizing your website’s images for Google Image Search can significantly boost your site’s visibility and traffic.
Here are a few reasons why:
- Increased Visibility: High-quality, optimized images can appear in Google Image Search results. They can attract more clicks and visits to your website.
- Enhanced User Experience: Well-optimized images improve the overall user experience. That is leading to longer site visits and lower bounce rates.
- SEO Benefits: Properly optimized images contribute to your site’s SEO efforts. Those properly optimized images improve your overall search engine rankings.
In this blog post, we will explore various strategies and techniques for driving more traffic to your website using Google Image Search. From optimizing your images to leveraging Google’s tools, we will cover everything you need to know to make the most of this powerful feature.
Optimizing Your Images
Best Practices for Image SEO
Ensure your images contribute effectively to your website’s SEO. It is crucial to follow best practices for optimization. This section will focus on two key aspects: choosing the right file format and using descriptive filenames.
Choosing the Right File Format
Selecting the correct file format for your images is essential for balancing quality and performance. Different formats serve different purposes. Understanding their strengths and weaknesses can help you choose your content best.
JPEG (Joint Photographic Experts Group)
JPEG is one of the most widely used image formats on the web. It is particularly well-suited for photographs and images with complex colors and gradients. Here is why you might choose JPEG:
- Compression: JPEG offers lossy compression. Lossy Compression significantly reduces file size while maintaining acceptable quality. This makes your web pages load faster.
- Color Depth: Supports millions of colors. That makes it ideal for detailed and vibrant images.
- File Size: Generally smaller than other formats. Therefore, it is beneficial for website performance.
When to Use: Photographs, images with complex colors and gradients, where small file size is more important than perfect quality.
PNG (Portable Network Graphics)
PNG is known for its lossless compression. It preserves image quality without any loss. It is perfect for images that require high detail and transparency.
- Transparency: Supports alpha channels. It allows for transparent backgrounds.
- Quality: It maintains high quality with no loss of detail. That makes it ideal for graphics, logos, and images with text.
- File Size: Typically larger than JPEGs due to lossless compression.
When to Use: Logos, icons, images with text, and any graphics requiring transparency or high detail.
WebP (Web Picture Format)
WebP is a modern image format developed by Google. It is designed to provide superior compression for both lossy and lossless images.
- Compression: Offers both lossy and lossless compression. It is significantly reducing file sizes while maintaining high quality.
- Performance: Smaller file sizes lead to faster load times and better performance, especially on mobile devices.
- Quality: Comparable or better quality than JPEG and PNG for the same file size.
When to Use: General-purpose images on the web. That is especially true when performance and load times are critical.
GIF (Graphics Interchange Format)
GIF is an older format best known for its support of simple animations. However, it is less efficient for static images due to limited color depth and larger file sizes.
- Animations: Supports simple animations that can be engaging for users.
- Color Depth: Limited to 256 colors. That makes it less suitable for detailed images.
When to Use: Simple animations, small icons, or images with limited colors.
Choosing the right file format for each image can optimize your website’s load times and overall user experience. That positively impacts your SEO efforts.
Using Descriptive Filenames
Filenames play a crucial role in image SEO. A well-named image file can help search engines understand the content of your images. The appropriate filenames make them more likely to appear in relevant search results.
Why Descriptive Filenames Matter
When search engines crawl your website, they read the filenames of your images to gather context about the image content. Descriptive filenames provide clear signals about the image, improving its chances of ranking in image searches.
Best Practices for Descriptive Filenames
-
Be Specific and Descriptive
Use filenames that accurately describe the image’s content. For example, instead of “IMG1234.jpg,” use “golden-retriever-playing-in-park.jpg.” This tells search engines exactly what the image depicts.
-
Include Relevant Keywords
Incorporate relevant keywords into your filenames naturally. This can enhance your image’s SEO value. For instance, a filename like “sunset-beach-vacation.jpg” is beneficial if your article is about beach vacations.
-
Use Hyphens to Separate Words
Search engines read hyphens as spaces. Use hyphens to separate words in your filenames (“beach-sunset-photo.jpg”). Avoid using underscores, as search engines can mistake them as part of a single word.
-
Avoid Keyword Stuffing
While it is essential to include keywords, avoid overloading your filenames with them. This can be seen as spammy behavior by search engines. Keep it natural and relevant.
-
Keep It Concise
While detail is important, keep filenames concise and to the point. Search engines can truncate long filenames, which may lose valuable context.
Examples of Effective Filenames
- Bad: IMG_4567.jpg
- Good: red-sports-car-on-racetrack.jpg
- Bad: image123.jpg
- Good: fresh-strawberries-closeup.jpg
Follow these best practices for descriptive filenames. By doing so, you can enhance the SEO of your images. That makes them more discoverable in Google Image Search and drives more traffic to your website.
Implementing these practices will improve your image SEO and contribute to a better user experience. That is ultimately leading to increased engagement and higher rankings.
Alt Text: Your Secret Weapon
Alt text or alternative text is a vital component of image optimization that often goes underutilized. It serves multiple purposes, such as improving accessibility for visually impaired users. In addition, it enhances user experience. Further, it aids search engines in understanding the content of your images. By writing effective alt text, you can boost your website’s SEO. And you can ensure that your images reach a broader audience.
Writing Effective Alt Text
Compelling alt text should be descriptive and concise. Further, it is relevant to the content of the image. Here is how to write alt text that will enhance your SEO and improve accessibility:
-
Be Descriptive and Specific
Describe the content and function of the image clearly and specifically. Avoid vague descriptions. Instead of “dog,” use “golden retriever playing in the park.”
Example:
- Bad: “tree”
- Good: “Oak tree in autumn with golden leaves.”
Include Relevant Keywords
Incorporate keywords naturally within the alt text. But ensure it remains descriptive and meaningful. Keywords should be relevant to both the image and the page’s overall content.
Example:
- Bad: “image of a dog”
- Good: “Golden retriever playing fetch in a sunny park.”
- Convey the Image’s Context and Purpose
If the image serves a specific purpose on the page, such as a button or a link, include that in the alt text. For instance, if an image is a call-to-action button, describe its function.
Example:
- Bad: “click here”
- Good: “Download the eBook button.”
-
Keep It Concise
While it is important to be descriptive, avoid lengthy alt text. Aim for a concise yet complete description. Typically, one or two sentences should suffice.
Example:
- Bad: “This is an image of a beautiful and colorful garden with various types of flowers and a large tree in the background.”
- Good: “colorful flower garden with a large oak tree in the background.”
-
Describe Text in Images
If your image contains text that is important for understanding the content, include this text in the alt description.
Example:
-
- Bad: “text in image.”
- Good: “Infographic showing the benefits of organic farming.”
-
Consider the Audience
Think about how a visually impaired person might understand the image with your description. Ensure the alt text provides enough context for users who cannot see the image.
Example:
-
- Bad: “Happy family”
- Good: “A Happy family of four smiles and poses for a photo in front of their new home.”
Avoiding Common Alt Text Mistakes
While writing alt text, it is easy to fall into some common pitfalls. Here is how to avoid the most frequent mistakes:
- Avoid Keyword Stuffing
Cramming alt text with keywords can be detrimental. Search engines may penalize your site for over-optimization. And it makes the alt text less useful for visually impaired users.
Example:
- Bad: “Dog playing in park, dog running, dog fetching ball, golden retriever.”
- Good: “Golden retriever playing fetch in a sunny park.”
-
Don’t Leave Alt Text Blank
Every image should have alt text, even if it is simple and functional. Leaving alt text blank misses an opportunity for SEO and can be an accessibility barrier.
Example:
- Bad: alt=””
- Good: alt=”company logo.”
-
Avoid Redundant Phrases
Phrases like “image of” or “picture of” are redundant since screen readers already announce that it is an image. Jump straight into the description.
Example:
- Bad: “image of a sunny beach”
- Good: “Sunny beach with white sand and clear blue water.”
-
Be Mindful of Decorative Images
For purely decorative images that do not add any content or context, use a null alt attribute (alt=””). This tells screen readers to ignore these images.
Example:
- Decorative image of a line break or a border pattern: alt=””
-
Do not use Generic Descriptions
Avoid using generic descriptions like “photo1.jpg” or “image123.jpg” as alt text. They provide no value to users or search engines.
Example:
- Bad: “photo1.jpg”
- Good: “Red sports car on a racetrack.”
-
Update Alt Text for Changing Context
If you reuse an image in different contexts, update the alt text to match the new context. The same image might serve different purposes on different pages.
Example:
-
- In a blog post about dog breeds: “Golden retriever playing fetch in a sunny park.”
- On a page about outdoor activities: “playing fetch with a dog in a sunny park.”
Avoid these common mistakes and follow best practices. Then only you can ensure your alt text is effective. And it can improve both your SEO and the accessibility of your website. Properly optimized alt text helps search engines index your images better and provides a richer experience for all users.
Technical Optimization
Optimizing the technical aspects of your images is crucial for enhancing your website’s performance and user experience. Faster-loading images can significantly reduce bounce rates. That improves SEO and keeps visitors engaged. This section will cover improving image load times through effective image compression and the tools available for optimizing image size.
Improving Image Load Times
Importance of Image Compression
Image compression is the process of reducing the file size of images without significantly affecting their quality. Smaller image files load faster. That is more is critical for several reasons:
- Enhanced User Experience
Visitors expect web pages to load quickly. Slow-loading images can frustrate users. And that may lead to higher bounce rates and lower engagement. Compressed images help ensure a smooth and speedy user experience.
- Better SEO
Google considers page load speed to be a ranking factor. Faster-loading pages with optimized images are more likely to rank higher in search engine results. Additionally, Google’s mobile-first indexing means mobile page speed is crucial for SEO success.
- Reduced Bandwidth Usage
Smaller image files consume less bandwidth. That is beneficial for both website owners and users. This is particularly important for mobile users and those with limited data plans.
- Improved Accessibility
Quick-loading images enhance the accessibility of your website. That makes it more usable for people with slower internet connections or older devices.
Types of Image Compression
There are two main types of image compression: lossy and lossless.
- Lossy Compression: This reduces file size by permanently eliminating some data. And that can result in a slight loss of quality. JPEG is a standard format that uses lossy compression.
- Lossless Compression: This reduces file size without any loss of quality by removing redundant data—formats like PNG and WebP support lossless compression.
Tools for Optimizing Image Size
Numerous tools are available to help you compress and optimize your images effectively. These tools vary in features and capabilities. That is making it easier to find one that suits your needs.
-
Adobe Photoshop
Photoshop offers advanced options for saving and optimizing images. The “Save for Web” feature allows you to adjust quality settings and see a preview of the compressed image.
How to Use:
-
- Open your image in Photoshop.
- Go to File > Export > Save for Web (Legacy).
- Choose the format (JPEG, PNG, and GIF) and adjust quality settings to balance between file size and image quality.
- Preview the result and save the optimized image.
-
TinyPNG
TinyPNG is an online tool that reduces the file size of PNG and JPEG images using smart lossy compression techniques.
How to Use:
-
- Visit TinyPNG.com.
- Drag and drop your images onto the interface.
- The tool will automatically compress your images and provide a download link for the optimized files.
-
ImageOptim
ImageOptim is a free tool for Mac users that optimizes images without losing quality. It supports various formats, including JPEG, PNG, and GIF.
- Download and install ImageOptim.
- Drag and drop your images into the application.
- The tool will automatically optimize and compress the images.
-
Kraken.io
Kraken.io is a versatile image optimization tool offering lossy and lossless compression. It has a web interface and API for automating image optimization.
How to Use:
- Visit Kraken.io and choose either the free web interface or the paid API.
- Upload your images and select the desired compression method (lossy or lossless).
- Download the optimized images.
-
Squoosh
Squoosh is a powerful online tool by Google that allows you to compress and compare images using various codecs.
How to Use:
- Visit the Squoosh.app.
- Drag and drop your image onto the interface.
- Use the sliders and options to adjust compression settings.
- Preview the changes in real-time and download the optimized image.
-
ShortPixel
ShortPixel is a WordPress plugin that optimizes images automatically as you upload them. It supports lossy and lossless compression and can optimize all your existing images.
- Install and activate the ShortPixel plugin on your WordPress site.
- Configure the settings to choose the compression type (lossy or lossless).
- The plugin will automatically optimize new uploads and can bulk-optimize existing images.
Best Practices for Image Optimization
- Use the Appropriate File Format: Choose the correct file format for each image type. JPEG for photos, PNG for images needing transparency, and WebP for modern, high-performance images.
- Resize Images Before Uploading: Ensure images are no larger than necessary for display dimensions. Uploading huge images slows down your site.
- Leverage Browser Caching: Configure your web server to cache images. That can reduce load times for returning visitors.
- Implement Lazy Loading: Lazy loading defers the loading of off-screen images until the user scrolls to them. That is improving initial page load times.
Implement these practices and utilize the right tool to improve your image load times significantly. Besides, it enhances user experience. Further, it boosts your website’s SEO performance.
Responsive Images for All Devices
In this multi-device world, ensuring your website’s images are responsive is essential. This means images should adjust and display correctly on any device. Responsive images improve user experience and help maintain site performance across various screen sizes and resolutions.
Implementing Responsive Image Techniques
Responsive image techniques involve using HTML and CSS to adapt images to different screen sizes and resolutions. Here is a detailed look at how to implement these techniques effectively:
-
Using the <picture> Element
The <picture> element allows you to define multiple sources for an image. That offers different resolutions or formats based on the user’s device or screen size.
Example:
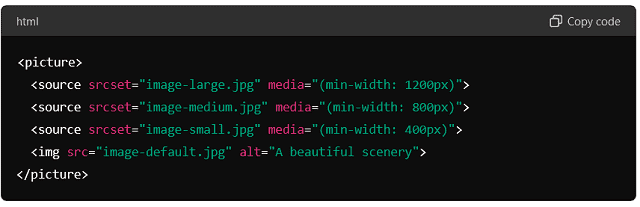
In this example, the browser selects the appropriate image based on the screen size to ensure the best performance and quality.
- Using the srcset Attribute
The srcset attribute in the <img> tag allows you to specify multiple image files with different resolutions. The browser chooses the most suitable based on the screen resolution and size.
Example:
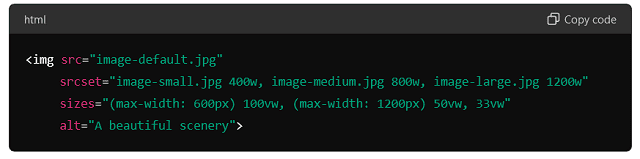
Here, srcset provides different image versions, while sizes define the image’s display width based on the viewport size.
- CSS Media Queries
Media queries in CSS can also ensure images are responsive. This technique involves adjusting the image’s size and style based on the screen size.
Example:
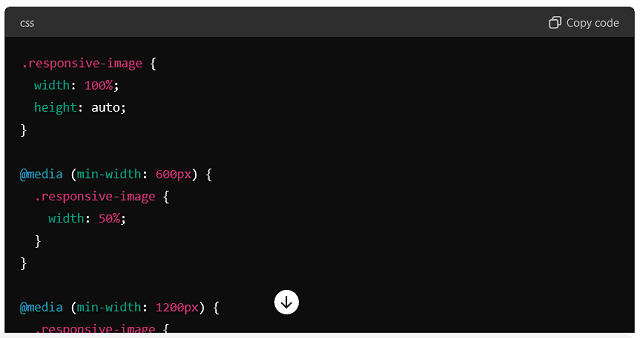
These media queries adjust the image size dynamically. That is ensuring it looks good on all devices.
-
Using max-width and height:
auto
Setting the max-width property to 100% and the height to auto ensures that images scale proportionally while fitting within their container.
Example:

This simple approach ensures images resize correctly within their containers to maintain their aspect ratio.
Benefits of Using srcset and sizes Attributes
The srcset and size attributes provide significant advantages when optimizing images for different devices and screen resolutions. Here is why you should use them:
-
Improved Performance
By specifying multiple image sources with srcset, the browser can choose the most appropriate image based on the device’s capabilities. This reduces load times, especially on mobile devices with slower connections. Further, it enhances overall website performance.
-
Better User Experience
Responsive images ensure that users see the most suitable version of an image, regardless of their device. High-resolution images for larger screens and optimized versions for smaller screens improve the visual experience and ensure crisp and clear images.
-
Optimized Bandwidth Usage
Serving appropriately sized images based on the user’s device helps reduce unnecessary data usage. This is particularly important for mobile users with limited data plans. That is leading to a more efficient use of bandwidth.
-
SEO Benefits
Fast-loading, responsive images contribute to better SEO rankings. Google prioritizes websites offering a good user experience and responsive images. By improving load times and reducing bounce rates, you can enhance your site’s SEO performance.
-
Future-Proofing Your Website
The web is constantly evolving, with new devices and screen sizes being introduced regularly. Using srcset and sizes makes your images adaptable to future changes. It is ensuring they continue to display correctly as technology advances.
Example Implementation with Benefits:

- Improved Performance: The browser selects the optimal image size. And that is improving load times.
- Better User Experience: Users see the best version of the image for their device.
- Optimized Bandwidth Usage: Smaller images for mobile users save data.
- SEO Benefits: Faster page loads contribute to better search engine rankings.
- Future-Proofing: The image setup remains effective as new devices are released.
Implement responsive image techniques and leverage the attributes of srcset and sizes. This will significantly enhance your website’s performance, user experience, and SEO. It ensures your images look great and load efficiently on all devices, providing a seamless browsing experience for your audience.
Enhancing Image Visibility
Images play a crucial role in attracting and retaining visitors to your website. High-quality and engaging visuals enhance user experience and improve your site’s SEO and visibility in search results. This section focuses on creating engaging, high-quality images and leveraging original and unique visuals to captivate your audience and improve your site’s performance.
Creating Engaging and High-Quality Images
High-quality, engaging images can significantly affect how users perceive your content and how likely they are to share it. Here are some tips and strategies to create captivating visual content:
Tips for Captivating Visual Content
-
Understand Your Audience
Know your target audience and what images will resonate with them. Tailoring your visuals to your audience’s preferences and interests can make your content more appealing and engaging.
-
Focus on Composition
Good composition is crucial to creating visually appealing images. Compose your shots using techniques like the rule of thirds, leading lines, and symmetry. Proper framing and balanced elements within the image draw viewers’ attention and make the image more interesting.
Example: In a landscape photo, place the horizon line along the upper or lower third of the frame instead of directly in the center. This adds depth and interest to the image.
-
Use High-Resolution Images
Ensure your images are high-resolution to maintain clarity and sharpness, especially for large displays. Blurry or pixelated images can detract from the professionalism of your website and reduce user engagement.
-
Employ Vibrant Colors and Contrast
Bright, vibrant colors and strong contrasts can make your images stand out. However, use colors that complement your website’s overall design and branding. Ensure the images are not overly saturated, which can be distracting.
Example: In product photography, use a white background to make the product stand out and look clean and professional.
-
Tell a Story
Images that tell a story or evoke emotions are likelier to engage viewers. Choose images that convey a message. Choose the images that best represent a theme or illustrate a concept that aligns with your content.
Example: A travel blog post about an adventure trip can include images showing the journey, the activities, and the travelers’ emotions.
-
Incorporate Text and Graphics
Adding text overlays or graphics to your images can make them more informative and engaging. Use text to highlight key points, quotes, or call-to-action messages. Ensure the text is readable and complements the image without overwhelming it.
Example: An infographic summarizing key statistics or tips can make complex information more accessible and visually appealing.
-
Use Consistent Styles
Maintain a consistent style across all your images to create a cohesive visual identity. Consistent use of colors, filters, and design elements helps reinforce your brand and makes your content more recognizable.
Leveraging Original and Unique Images
Using original and unique images can set your content apart from the competition and improve its visibility. Stock photos can be useful. However, they often need more originality and a personal touch to make content truly engaging.
-
Create Your Own Images
Taking your own photos or creating custom graphics ensures your images are unique and tailored to your needs. It also adds a personal touch to help build a connection with your audience.
Example: Instead of using generic stock photos, include photos showcasing actual employees and activities for a blog post about a company event.
-
Illustrations and Custom Graphics
Custom illustrations and graphics can add a distinctive style to your content. They can be particularly effective for explaining complex concepts. Besides, they can add a creative flair or reinforce your brand identity.
Example: A tech blog explaining a new software feature can include custom illustrations to represent the feature’s functionality visually.
-
User-Generated Content
Encourage your audience to create and share their own images related to your brand or content. User-generated content adds authenticity and can foster a sense of community. Share and highlight the best submissions on your website and social media.
Example: A fashion brand can encourage customers to share photos of themselves wearing its clothing using a specific hashtag. These images can then be featured on the brand’s website.
-
Infographics and Data Visualization
Infographics are an excellent way to present data and information visually appealingly. They can simplify complex information and make it more digestible. Custom infographics tailored to your content can significantly enhance engagement and shareability.
Example: A blog post about the health benefits of different foods can include an infographic that clearly and visually engages readers with nutritional information and health benefits.
-
Personalization and Relevance
Ensure your images are relevant to the content and add value to your message. Personalize images to align with your brand’s voice and the specific topic of the content.
Example: For a tutorial blog post, use step-by-step screenshots or photos that guide the reader through the process. That is making it easier to follow.
SEO Benefits of Unique Images
-
Higher Click-Through Rates
Unique and engaging images can increase click-through rates in image search results. Eye-catching visuals are more likely to attract users’ attention and encourage them to visit your site.
-
Better Search Rankings
Original images with proper optimization (alt text, descriptive filenames, etc.) can improve your rankings in search engines. Search engines favor original content over stock photos or reused images.
-
Enhanced Social Media Engagement
Unique images are more likely to be shared on social media. That is increasing your content’s reach and visibility. High engagement on social media can also drive more traffic to your website.
Focus on creating high-quality, engaging, and unique images. Doing so can significantly enhance your website’s visibility and appeal. These strategies not only improve user experience but also provide valuable SEO benefits. These strategies are helping your content stand out in a crowded digital landscape.
Image Sitemaps and Structured Data
Optimizing your images for search engines goes beyond just the images themselves. Implementing image sitemaps and structured data (such as schema markup) can significantly enhance your images’ visibility in search results. These techniques help search engines better understand and index your images. That is leading to improved rankings and more traffic.
How to Create an Image Sitemap
An image sitemap is a file that provides search engines with information about the images on your website. It helps ensure that all your images are discovered and indexed. That can improve their visibility in search results.
Steps to Create an Image Sitemap:
-
Understand the Format
An image sitemap follows the same format as a regular XML sitemap but includes additional tags specific to images. Each URL entry can consist of multiple image entries with its own set of tags.
-
Identify Important Images
Determine which images you want to include in your sitemap. Typically, these images add significant value to your content and are important for search visibility.
-
Generate the Sitemap
You can manually create an image sitemap or use tools and plugins that automate the process. Below are the steps to manually create one:
Example:

-
- In this example:
- <urlset> contains all URL entries.
- Each <url> entry represents a page on your website.
- Each <image:image> entry within a <url> specifies an image on that page, including its URL (<image:loc>), caption (<image:caption>), and title (<image:title>).
- In this example:
-
Use Sitemap Generators
Tools like Screaming Frog, Yoast SEO (for WordPress), and other SEO plugins can automatically generate image sitemaps. These tools can save time and ensure your sitemap is correctly formatted.
-
Submit Your Sitemap
Once your sitemap is ready, submit it to search engines via their respective webmaster tools:
-
- For Google, use Google Search Console.
- For Bing, use Bing Webmaster Tools.
In Google Search Console, go to the “Sitemaps” section, enter the URL of your sitemap, and click “Submit.”
Benefits of Image Sitemaps:
- Improved Indexing: Ensures search engines discover and index all important images.
- Enhanced Visibility: Helps search engines understand the context of your images. That is improving their chances of appearing in relevant search results.
- Better SEO Performance: Contributes to overall SEO by enhancing the completeness of your site’s indexing.
Using Schema Markup for Images
Schema markup, or structured data, provides search engines with additional information about the content on your website, including images. Using schema markup for images helps search engines understand the context and relevance of your images. That can improve their visibility in search results.
Steps to Implement Schema Markup for Images:
-
Choose the Right Schema Type
Depending on the context of your images, you may choose different types of schema markup. Common types of images include ImageObject, Article, Product, and Recipe.
Example:
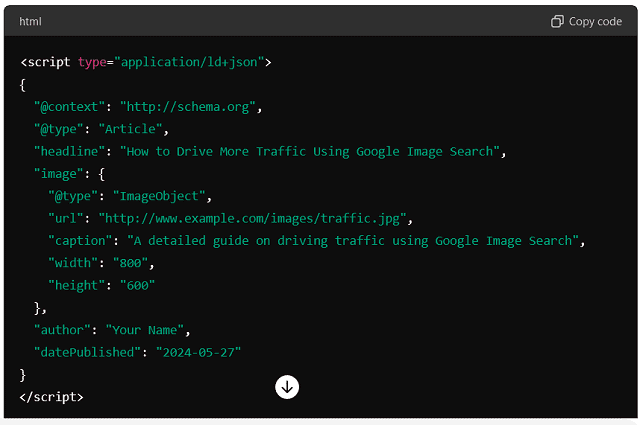
• Add Schema Markup to Your HTML
Include the schema markup in your web page’s HTML. You can do this manually or with the help of SEO plugins for platforms like WordPress.
-
Use Tools to Generate Schema Markup
Tools like Google’s Structured Data Markup Helper and Schema.org’s generator can help you create and test your schema markup. These tools guide you through the process and ensure your markup is correctly formatted.
-
Test Your Markup
Use Google’s Rich Results Test and the Schema Markup Validator to test your structured data. These tools can identify errors and provide suggestions for improvement.
-
Update and Maintain Your Markup
Regularly update your schema markup to ensure it remains accurate and relevant. As your content changes, make sure your structured data reflects those updates.
Benefits of Using Schema Markup for Images:
- Enhanced Search Appearance: Images with schema markup are more likely to appear in rich results, such as Google’s image carousel or knowledge panels.
- Better Context Understanding: This helps search engines understand the context and content of your images. That is improving their relevance in search results.
- Increased Click-Through Rates: Rich results and enhanced listings attract more attention and can lead to higher click-through rates.
- Improved SEO: Structured data contributes to overall SEO performance by providing more detailed information to search engines. That is potentially improving rankings.
Create an image sitemap and implement schema markup for your images. Doing so can significantly enhance their visibility and performance in search results. These techniques ensure search engines can effectively discover, index, and understand your images. And that is leading to improved traffic and engagement.
Leveraging Google Tools
Google offers several tools that can significantly enhance your image optimization efforts. Among these, Google Search Console stands out as an invaluable resource for monitoring, analyzing, and improving the performance of your images in search results. This section will delve into how to use Google Search Console effectively for image optimization.
Using Google Search Console for Image Optimization
Google Search Console (GSC) is a free service provided by Google that helps you monitor, maintain, and troubleshoot your website’s presence in Google Search results. For images, GSC delivers insights into how your images perform and identifies areas for improvement.
Monitoring Image Search Performance
To make the most out of Google Search Console for image optimization, follow these steps:
-
Set Up Google Search Console
If you have not already, set up Google Search Console for your website. Then, verify ownership of your site by following Google’s verification methods, which include adding an HTML file to your site, using a metatag, Google Analytics, Google Tag Manager, or a domain name provider.
-
Navigate to the Performance Report
In the left-hand sidebar, click on “Performance” to view the Performance report. This report provides data on how your website performs in Google Search, including metrics like total clicks, impressions, average CTR (click-through rate), and average position.
-
Filter for Image Search
To focus specifically on images, click on the “Search Type” filter at the top of the Performance report and select “Image.” This filter will adjust the report to show data related to image search.
-
Analyze Key Metrics
- Total Clicks: Indicates how often users clicked on your images in search results.
- Total Impressions: Shows how many times your images appeared in search results.
- Average CTR: The ratio of clicks to impressions is termed CTR. Average CTR indicates the effectiveness of your image thumbnails and titles.
- Average Position: The average ranking of your images in search results.
Analyzing these metrics lets you gain insights into your images’ performance and identify trends or patterns.
-
Identify High-Performing Images
Look for images with high clicks and impressions but low CTR. This could indicate that while your images are visible, they may not be compelling enough to click on. Conversely, images with high CTR and high position can serve as benchmarks for creating and optimizing other images.
-
Assess Query Performance
Examine the queries that are driving traffic to your images. Understanding what search terms users use to find your images can help you better optimize your alt text, filenames, and captions to match user intent.
Fixing Image Indexing Issues
Indexing issues can prevent your images from appearing in Google Search, significantly impacting their visibility. Google Search Console provides tools to identify and fix these issues.
-
Check the Coverage Report
The Coverage report in GSC shows the status of your site’s pages and identifies any indexing issues. To check the indexing status of your images:
- In the left-hand sidebar, click on “Coverage.”
- Look for errors or warnings that might affect image indexing, such as “Crawled – currently not indexed” or “Discovered – currently not indexed.”
Inspect URLs
Use the URL Inspection tool to check the indexing status of specific pages containing images. This tool provides detailed information about how Google views a particular URL and its images.
- Enter the URL of the page containing the image in the URL Inspection tool.
- Check the results for issues related to image indexing, such as blocked resources, noindex directives, or crawl anomalies.
-
Submit URLs for Indexing
If you find pages that are not indexed, you can request indexing through the URL Inspection tool:
- After inspecting the URL, click on “Request Indexing.”
- Google will re-crawl the page; if there are no issues, it will be added to the index.
-
Resolve Common Indexing Issues
- Blocked by Robots.txt: Ensure that your robots.txt file does not block important images or the pages that contain them. Allow Googlebot to access these resources.
- Noindex Directive: Check your HTML or HTTP headers for any noindex tags that might prevent indexing. Remove or adjust these directives as needed.
- Crawl Errors: Address any crawl errors reported in GSC, such as 404 errors for image URLs. Ensure that all image URLs are correct and accessible.
-
-
Optimize Page Load Speed
-
Slow-loading pages can hinder Google’s ability to efficiently crawl and index your images. Use tools like Google PageSpeed Insights to identify and fix issues affecting page load times, such as large image files, unoptimized scripts, and inefficient server configurations.
-
Submit an Image Sitemap
An image sitemap can help Google discover and index all the important images on your site. Make sure your image sitemap is up-to-date and includes all relevant images. Submit the sitemap through the “Sitemaps” section in GSC.
Benefits of Using Google Search Console for Image Optimization
- Improved Visibility: By monitoring performance and fixing indexing issues, your images are more likely to appear in relevant search results.
- Enhanced SEO: Detailed insights and data help you optimize images more effectively. That is contributing to better overall SEO performance.
- Proactive Issue Resolution: Identifying and resolving indexing issues promptly ensures that your images are always available to users in search results.
- Data-Driven Decisions: Access to detailed performance metrics allows you to make informed decisions about your image optimization strategies.
Leverage the tools and insights provided by Google Search Console. By doing so, you can optimize your images for better performance in search results. That is ensuring they contribute to driving more traffic to your website.
Google My Business and Image Search
Optimizing images for local SEO and utilizing Google My Business (GMB) photos can significantly boost your visibility in local search results. Google My Business is a powerful tool for local businesses to enhance their online presence and attract local customers. This section will cover how to optimize images for local SEO and the best practices for Google My Business photos.
Optimizing Images for Local SEO
Local SEO optimizes your online presence to attract more business from relevant local searches. High-quality, well-optimized images can improve your local search rankings. And that makes your business more attractive to potential customers.
Steps to Optimize Images for Local SEO:
-
Choose Relevant Images
Use images that are relevant to your business and services. Include photos of your storefront, interior, products, staff, and any unique features that set your business apart.
-
Use High-Quality Images
High-quality images create a positive impression and can influence customers’ decisions. Ensure your images are clear, well-lit, and professionally taken if possible.
-
Optimize Image Size
Large image files can slow down your website. In addition, that negatively impacts user experience and SEO. Use image compression tools to reduce file size without sacrificing quality. Aim for a balance between image quality and load time.
Tools for Image Compression: TinyPNG, JPEG-Optimizer, ImageOptim, and Photoshop.
-
Use Descriptive Filenames
Rename your image files with descriptive keywords related to your business and location. Instead of generic filenames like “IMG_1234.jpg,” use descriptive names like “bobs-coffee-shop-downtown.jpg.”
Example: For a bakery in New York, use filenames like “nyc-bakery-cupcakes.jpg” or “best-croissants-new-york.jpg.”
-
Add Alt Text with Local Keywords
Alt text helps search engines understand what the image is about and improves accessibility for users with visual impairments. To enhance local SEO, include local keywords in your alt text.
Example: For an image of a coffee shop in Boston, use alt text like “Cozy coffee shop in Boston serving artisanal coffee and pastries.”
-
Geotag Your Images
Geotagging adds geographical metadata to your images, which can help search engines associate your photos with a specific location. Tools like GeoImgr can help you add geotags to your images.
-
Ensure Mobile-Friendliness
Mobile search is crucial for local SEO. Ensure your images are responsive and look good on all devices, including smartphones and tablets. Use responsive design techniques to optimize images for different screen sizes.
Benefits of Optimizing Images for Local SEO:
- Improved Local Search Rankings: Better-optimized images can enhance your visibility in local search results.
- Enhanced User Experience: High-quality, fast-loading images improve user experience. And those can lead to higher engagement and conversions.
- Greater Engagement: Relevant and appealing images can attract more clicks and engagement from potential customers.
Best Practices for Google My Business Photos
Google My Business photos significantly influence local SEO and customer engagement. High-quality, well-optimized images can make your GMB listing more attractive and informative. That may lead to more traffic and business.
Best Practices for Google My Business Photos:
-
Upload High-Resolution Photos
Use high-resolution images that are at least 720 pixels wide by 720 pixels tall. High-quality photos create a positive impression and make your listing stand out.
-
Use a Variety of Photo Types
Include a mix of different types of photos to give potential customers a comprehensive view of your business. These can include:
- Profile Photos: A clear, high-quality image representing your business, such as your logo.
- Cover Photos: A large, visually appealing photo that best represents your business.
- Interior Photos: Images of the inside of your business. Those show the ambiance and layout.
- Exterior Photos: Photos of the outside of your business. Those are making it easier for customers to find you.
- Product Photos: High-quality images of your products or services.
- Team Photos: Pictures of your staff can help build a personal connection with customers.
- Action Shots: Images of your team in action, such as serving customers or making products.
-
Use Relevant Keywords in Captions
When adding captions to your photos, include relevant keywords that describe the image and relate to your business and location. This helps with SEO and provides additional context for search engines.
Example: “Freshly baked artisan bread at our San Francisco bakery.”
-
Regularly Update Your Photos
Keep your GMB photo gallery up-to-date by regularly adding new images. This shows that your business is active. Further, that can help keep your listing fresh and engaging.
-
Encourage Customer Photos
Encourage your customers to upload their photos to your GMB listing. User-generated content adds authenticity and can provide different perspectives of your business. Respond to customer photos and reviews to show engagement.
-
Maintain Consistent Branding
Ensure your photos are consistent with your brand’s visual identity. Use similar color schemes, lighting, and styles to create a cohesive look across all your images.
-
Follow Google’s Photo Guidelines
Adhere to Google’s guidelines for GMB photos to ensure your images are accepted and displayed correctly. These guidelines include using the appropriate file format (JPG or PNG), maintaining a good aspect ratio, and avoiding excessive filters or editing.
Benefits of Optimizing Google My Business Photos:
- Increased Visibility: High-quality, well-optimized photos can improve your visibility in local search results and Google Maps.
- Better User Engagement: Attractive and informative photos can increase engagement with your GMB listing. Further, that is leading to more clicks and visits.
- Enhanced Credibility: High-quality photos help build trust and credibility with potential customers. That is making them more likely to choose your business.
- Improved Conversion Rates: Detailed and appealing images can encourage more customers to visit your website, call, or visit your physical location.
Optimize your images for local SEO and follow best practices for Google My Business photos. That can significantly enhance your online presence and attract more local customers. High-quality, relevant images improve your search rankings. And they also create a positive impression and drive more engagement with your business.
Advanced Strategies
Visual content continues to gain prominence on the internet. That is, harnessing the power of visual search has become increasingly important for driving traffic to your website. Visual search technology allows users to search using images instead of text. That is opening up new opportunities for businesses to reach their audience. This section will delve into understanding visual search technology. Further, this section will help you how to optimize for visual search engines effectively.
Harnessing the Power of Visual Search
Visual search transforms how users interact with the internet by making it possible to search for information using images. This technology uses artificial intelligence and machine learning to analyze the content of images and deliver relevant search results. Understanding and leveraging visual search can give your business a competitive edge in attracting and engaging users.
Understanding Visual Search Technology
Visual search technology uses AI and machine learning to recognize objects, patterns, and context within an image. Unlike traditional text-based search, visual search relies on image recognition to identify and retrieve relevant information. Here is how it works:
-
Image Input
Users provide an image as the search query. This can be done by uploading a photo, taking a picture using a camera, or selecting an image from a website.
-
Feature Extraction
The visual search engine analyzes the image to extract critical features such as shapes, colors, textures, and patterns. This process involves complex algorithms that break down the image into identifiable elements.
-
Object Recognition
The extracted features are compared against a vast database of images to identify objects within the image. This step involves recognizing specific items, such as products, landmarks, or logos, and understanding their context.
-
Contextual Analysis
The visual search engine considers the context of the image to deliver more accurate results. This includes analyzing surrounding elements and understanding the relationship between objects within the image.
-
Search Results
Based on the analysis, the visual search engine returns relevant results. These can include similar images, related products, or additional information about the objects in the image.
Key Players in Visual Search Technology:
- Google Lens: Allows users to search by taking photos or using images from their gallery.
- Pinterest Lens: Enables users to discover ideas and products based on images.
- Bing Visual Search: Provides image-based search results and identifies objects within images.
- Amazon Visual Search: Helps users find products on Amazon by uploading photos or using the camera.
How to Optimize for Visual Search Engines
To leverage visual search technology effectively, you need to optimize your images to be easily discovered and accurately interpreted by visual search engines. Here are some strategies to optimize for visual search:
-
High-Quality Images
Ensure that all images on your website are high-resolution and clear. High-quality images are more likely to be accurately recognized by visual search engines.
-
Descriptive Filenames
Use descriptive and keyword-rich filenames for your images. Instead of generic names like “IMG1234.jpg,” use filenames that describe the image’s content, such as “red-leather-handbag.jpg.”
-
Alt Text Optimization
Write effective alt text for each image. Alt text should describe the image accurately and include relevant keywords. This helps search engines understand the image’s content and improves accessibility for visually impaired users.
-
Structured Data Markup
Use structured data markup to provide additional context about your images. Schema markup helps search engines understand the content and context of your images. That makes them more likely to appear in relevant search results.
Example: Use schema.org/Product markup to provide details about product images, including name, price, and availability.
-
Optimize Image Size
Large image files can slow down your website and negatively impact user experience. Use image compression tools to reduce file size without sacrificing quality. Ensure that your images load quickly to improve search engine rankings.
-
Create an Image Sitemap
An image sitemap helps search engines discover all the images on your website. It should include important details such as the image location, title, caption, and license information. To ensure your images are indexed, submit your image sitemap to Google Search Console.
-
Use Relevant Keywords in Captions and Surrounding Text
Include relevant keywords in the captions and surrounding text of your images. This will provide additional context for search engines and help them associate your images with relevant search queries.
-
Leverage User-Generated Content
Encourage customers to share photos of your products and tag your business. User-generated content can enhance your visual search presence and provide authentic images that resonate with potential customers.
-
Implement Responsive Images
Ensure your images are optimized for all devices, including desktops, tablets, and smartphones. Use responsive design techniques to ensure images display correctly across different screen sizes.
-
Monitor and Analyze Performance
Use tools like Google Search Console and Google Analytics to monitor your images’ performance in search results. Analyze metrics such as impressions, clicks, and click-through rates to understand how well your images perform and identify improvement areas.
Benefits of Optimizing for Visual Search:
- Increased Traffic: Optimizing for visual search can drive more traffic to your website as users discover your images through visual search engines.
- Enhanced User Engagement: High-quality, relevant images can engage users and encourage them to explore more content on your site.
- Competitive Advantage: Leveraging visual search technology can give you a competitive edge by reaching users who prefer image-based search over traditional text-based search.
- Improved SEO: Optimized images contribute to overall SEO efforts. That is improving your website’s visibility and ranking in search results.
Understand visual search technology and implement these optimization strategies without fail. That can effectively harness the power of visual search to drive more traffic to your website and enhance user engagement.
Utilizing Social Media for Image Traffic
Social media platforms are powerful tools for driving traffic to your website through image sharing. With billions of active users across various social networks, effectively leveraging these platforms can significantly increase your reach and engagement. This section will cover strategies for sharing images across social platforms and encouraging user-generated content to boost your image traffic.
Sharing Images across Social Platforms
Sharing images on social media platforms can help you reach a larger audience. In addition, you can engage with your followers and drive traffic to your website. Each social network has its own unique features and best practices for image sharing. Here is how to optimize your image-sharing strategy across different social platforms:
-
Facebook
- High-Quality Images: Use high-resolution images to ensure they look good on all devices.
- Engaging Captions: Write compelling captions encouraging users to engage with your content. Include relevant hashtags and links to your website.
- Optimal Dimensions: To ensure correct display, use images with a resolution of at least 1200 x 630 pixels.
- Consistency: Maintain a consistent posting schedule to keep your audience engaged.
-
Instagram
- Visual Aesthetics: Focus on high-quality, visually appealing images. Instagram is a highly visual platform, so aesthetics matter.
- Hashtags: Use relevant hashtags to increase the discoverability of your images. Research popular and niche hashtags in your industry.
- Stories and Reels: Utilize Instagram Stories and Reels to share more dynamic and temporary content. These features can help increase engagement and drive traffic.
- Link in Bio: Instagram limits direct linking in posts. Therefore, use the link in your bio to direct users to your website. Update the link regularly to reflect your latest content.
-
Twitter
- Clear and Concise: Use clear, high-quality images that stand out in the Twitter feed. Keep your captions concise and to the point.
- Optimal Size: Use images with a resolution of 1024 x 512 pixels for optimal display.
- Engaging Tweets: Combine images with engaging text, hashtags, and mentions to increase visibility and engagement.
- Tweet Regularly: Maintain an active presence by tweeting regularly and engaging with your followers.
-
Pinterest
- Vertical Images: For a better visibility, use vertical images with an aspect ratio of 2:3 (1000 x 1500 pixels).
- Descriptive Pins: Write detailed, keyword-rich descriptions for your pins to improve their discoverability.
- Rich Pins: Utilize Rich Pins to provide more context about your images, such as product details or articles.
- Pin Consistently: Pin regularly and curate boards that are relevant to your brand and audience.
-
LinkedIn
- Professional Images: Use high-quality, professional images that align with your brand’s image and message.
- Informative Captions: Write informative captions that provide value to your audience. Include relevant hashtags and links to your website.
- Optimal Size: Use images with a resolution of 1200 x 627 pixels for optimal display.
- Engage with Professionals: Share images that resonate with professionals in your industry and encourage engagement through comments and shares.
Benefits of Sharing Images across Social Platforms:
- Increased Reach: Social media platforms provide access to a large and diverse audience.
- Enhanced Engagement: High-quality, engaging images can capture users’ attention and encourage interaction.
- Traffic Generation: Including links to your website in your posts can drive traffic from social media to your site.
- Brand Awareness: Consistent image sharing helps build brand awareness and recognition.
Encouraging User-Generated Content
User-generated content (UGC) refers to any content your customers or followers create, including photos, videos, reviews, and social media posts. Encouraging UGC can enhance your brand’s credibility, engage your audience, and drive more traffic to your website.
-
Create Contests and Challenges
- Photo Contests: Host photo contests where customers can submit their photos featuring your products. Offer prizes or recognition to encourage participation.
- Hashtag Challenges: Create a unique hashtag for a challenge and encourage users to share their photos or videos using the hashtag. This can increase visibility and engagement.
-
Feature Customer Photos
- Social Media Shoutouts: Regularly feature customer photos on your social media profiles. Tag the users and thank them for their support.
- Website Galleries: Create a dedicated section on your website to showcase customer photos. This can build trust and encourage more customers to share their images.
-
Leverage Reviews and Testimonials
- Visual Reviews: Encourage customers to leave reviews along with photos of your products. Highlight these visual reviews on your social media and website.
- Video Testimonials: Ask satisfied customers to create video testimonials. Share these videos on your social platforms and website to build trust and credibility.
-
Incentivize Participation
- Discounts and Offers: Offer discounts, coupons, or other incentives for customers who share their photos and tag your brand.
- Exclusive Access: Provide exclusive access to new products or events for customers who actively engage and share content.
-
Engage with Your Audience
- Respond to UGC: Engage with users who share content by liking, commenting, and sharing their posts. This encourages more participation and strengthens community bonds.
- Create a Community: Foster a sense of community by encouraging users to interact with each other and share their experiences.
Benefits of Encouraging User-Generated Content:
- Authenticity and Trust: UGC is perceived as more authentic and trustworthy than branded content. That helps to build trust with your audience.
- Increased Engagement: Encouraging users to create and share content increases engagement and fosters a sense of community.
- Cost-Effective Content Creation: UGC provides a steady stream of content without the need for significant investment in content creation.
- Enhanced SEO: UGC can improve your SEO efforts by increasing the volume and variety of content related to your brand.
Sharing images across social platforms and encouraging user-generated content significantly boosts your online presence. It helps you to engage with your audience and drive more traffic to your website. These strategies help create a vibrant and interactive community around your brand. And it enhances your overall marketing efforts.
Conclusion
We have covered everything that bring traffic to your website in this blog post:How to Drive More Traffic Using Google Image Search? Leveraging Google Image Search can significantly enhance your website’s visibility and drive more traffic. Implement a comprehensive image SEO strategy to ensure your images are optimized to their full potential and reach a wider audience. In this conclusion, we will recap the key strategies discussed and emphasize the importance of continuous optimization.
Maximizing Traffic with Google Image Search
Driving traffic through Google Image Search involves a multifaceted approach. From optimizing your images to leveraging social media and encouraging user-generated content. Each strategy is crucial in increasing your site’s visibility and engagement. Here is a recap of the key strategies to maximize traffic with Google Image Search:
Recap of Key Strategies
-
Optimizing Your Images
- Choosing the Right File Format: Use appropriate file formats like JPEG for photographs and PNG for images with transparent backgrounds to ensure quality and load times.
- Using Descriptive Filenames: Rename your image files with descriptive, keyword-rich names to help search engines understand the content.
-
Alt Text: Your Secret Weapon
- Writing Effective Alt Text: Provide concise, accurate descriptions of your images using relevant keywords.
- Avoiding Common Alt Text Mistakes: Avoid keyword stuffing. And ensure that the alt text is truly descriptive of the image content.
-
Technical Optimization
- Improving Image Load Times: Compress images to reduce file size without sacrificing quality. That ensures faster load times.
- Tools for Optimizing Image Size: Utilize tools like TinyPNG or ImageOptim for efficient image compression.
-
Responsive Images for All Devices
- Implementing Responsive Image Techniques: Use CSS and HTML attributes to ensure images adapt to different screen sizes and resolutions.
- Benefits of Using srcset and sizes Attributes: To enhance image delivery, specify different image sources for various device widths.
-
Enhancing Image Visibility
- Creating Engaging and High-Quality Images: Invest in high-quality, original images that capture attention and align with your brand.
- Leveraging Original and Unique Images: Stand out by using unique images that reflect your brand’s identity and avoid stock images.
-
Image Sitemaps and Structured Data
- How to Create an Image Sitemap: Generate and submit an image sitemap to help search engines discover all images on your site.
- Using Schema Markup for Images: Implement structured data. That is to provide additional context and improve image search results.
-
Leveraging Google Tools
- Using Google Search Console for Image Optimization: Use Google Search Console to monitor image performance and address any indexing issues.
- Monitoring Image Search Performance: Regularly review performance metrics. The metrics help you understand how your images perform in search.
-
Google My Business and Image Search
- Optimizing Images for Local SEO: Use relevant keywords and high-quality images to enhance your local SEO efforts.
- Best Practices for Google My Business Photos: Ensure your business photos are up-to-date, high-quality, and representative of your services.
-
Advanced Strategies
- Harnessing the Power of Visual Search: Understand and optimize for visual search technology to reach users searching with images.
- How to Optimize for Visual Search Engines: Implement strategies like high-quality images, descriptive filenames, and structured data.
-
Utilizing Social Media for Image Traffic
- Sharing Images Across Social Platforms: Tailor your image-sharing strategy for each social media platform to maximize engagement and reach.
- Encouraging User-Generated Content: Foster a community that actively shares content featuring your brand. User-generated content increases authenticity and engagement.
Encouraging Continuous Optimization
The landscape of image search optimization is constantly evolving. Committing to continuous optimization is essential to maintaining and enhancing your visibility in Google Image Search. Here are some strategies to ensure ongoing success:
- Regular Audits
- Conduct regular audits of your images. That will ensure they meet current SEO best practices.
- Check for broken images or outdated alt text and make necessary updates.
- Stay Informed
- Keep up with the latest trends and updates in image search optimization and visual search technology.
- Follow industry blogs, attend webinars, and participate in forums to stay informed about new techniques and tools.
- Monitor Performance
- Use tools like Google Analytics and Google Search Console. These tools track the performance of your images.
- Analyze metrics such as click-through rates, impressions, and user engagement to identify areas for improvement.
- Optimize New Content
- Apply best practices to all new images you upload to your website.
- Ensure new images are high-quality, adequately formatted, and accompanied by descriptive filenames and alt text.
- Engage with Your Audience
- Encourage feedback from your audience regarding the images you use.
- Use insights from your audience to refine and improve your image strategy.
- Experiment and Innovate
- Don’t be afraid to experiment with new types of visual content like infographics, videos, or 360-degree images.
- Test different approaches to see what resonates best with your audience and drives the most traffic.
Continually optimize your images and stay abreast of the latest developments in image search. Only then can you maintain a competitive edge and ensure a steady traffic flow to your website. Remember, effective image SEO is an ongoing process that requires attention to detail, creativity, and a commitment to providing the best visual experience for your audience.
FAQ: How to Drive More Traffic Using Google Image Search
-
What is Google Image Search, and how can it drive traffic to my website?
Google Image Search allows users to search for information using images instead of text. By optimizing your images for Google Image Search, you can increase your website’s visibility, attract more visitors, and drive traffic to your site. This involves using high-quality images, descriptive filenames, alt text, and other SEO techniques to make your images more discoverable.
-
How do I optimize my images for Google Image Search?
To optimize your images for Google Image Search:
- Use high-quality images that are clear and relevant.
- Choose the right file format (JPEG for photos, PNG for transparent images).
- Rename your image files with descriptive, keyword-rich filenames.
- Write effective alt text that accurately describes the image and includes relevant keywords.
- Compress your images to reduce file size and improve load times.
- Use responsive design techniques to ensure images display correctly on all devices.
-
Why is alt text important for image SEO?
Alt text (alternative text) provides a textual description of an image. The alt text helps search engines understand the content of the image. It also improves accessibility for visually impaired users who use screen readers. Effective alt text should be concise and descriptive and include relevant keywords to enhance SEO.
-
What are some common mistakes to avoid when writing alt text?
Common mistakes to avoid when writing alt text include:
- Keyword stuffing: Search engines can see overloading the alt text with keywords as spammy.
- Vague descriptions: Using generic descriptions like “image1234” does not help search engines understand the content.
- Missing alt text: Not providing alt text at all means missing out on SEO and accessibility benefits.
- Overly long descriptions: Keep alt text concise and focused on the main content of the image.
-
How can I improve my image load times?
Improving image load times involves:
- Compress images to reduce file size without sacrificing quality using tools like TinyPNG or ImageOptim.
- Use the appropriate image format (JPEG, PNG, WebP) for the type of image.
- Implement lazy loading to defer loading off-screen images until they are needed.
- Use a content delivery network (CDN) to deliver images quickly to users across different locations.
-
What are responsive images, and why are they important?
Responsive images are designed to adapt to different screen sizes and resolutions. Ensure that they display correctly on desktops, tablets, and smartphones. Implementing responsive images involves using HTML attributes like srcset and sizes to specify different image sources for various device widths. This improves user experience and can positively impact SEO.
-
How can social media help drive traffic to my website through images?
Social media platforms can significantly boost your image traffic by:
- Sharing high-quality, engaging images that capture attention and encourage interaction.
- Use relevant hashtags to increase discoverability.
- Encourage user-generated content (UGC) by hosting contests and challenges.
- Featuring customer photos and testimonials to build trust and credibility.
- It can be linked back to your website in social media posts to drive traffic.
-
What is an image sitemap, and how do I create one?
An image sitemap is a file that provides information about the images on your website. It is helping search engines discover and index them. To create an image sitemap:
- List the URLs of all your images in an XML file.
- Include relevant details like the image title, caption, and license information.
- Submit the image sitemap to Google Search Console to improve indexing.
-
How can I use Google Search Console to optimize my images?
Google Search Console can help you optimize your images by:
- Monitoring the performance of your images in search results, including impressions and clicks.
- It is identifying and fixing image indexing issues.
- Further, it is submitting and updating your image sitemap.
- It is analyzing search traffic data to identify opportunities for improvement.
-
What are the benefits of using schema markup for images?
Schema markup (structured data) provides additional context about your images. Markup is helping search engines understand their content and context better. Benefits of using schema markup for images include:
- Improved search visibility and click-through rates.
- Enhanced appearance of your images in search results with rich snippets.
- Search engines’ better understanding of your content leads to more accurate indexing.
By following these tips, you can maximize the potential of Google Image Search to drive more traffic to your website and enhance your overall SEO efforts.
How Often Should I Update My Images?
It is good practice to update your images periodically to keep your content fresh and engaging. Here are some guidelines:
- Content Relevance: Update images when the content they represent changes or is updated.
- Seasonal Updates: Update images for seasonal events, holidays, or promotions.
- Visual Refresh: Refresh images to maintain a visually appealing website.
- SEO Optimization: Regularly review and optimize image metadata for better SEO.
- Performance Optimization: Monitor image load times and update if necessary.
- User Engagement: Update images to keep content engaging for your audience.
Can I Use Stock Photos for Image SEO?
Yes, you can use stock photos for image SEO. However, ensure they are relevant, licensed, and optimized:
- Relevance: Choose stock photos that are relevant to your content and audience.
- License: Use stock photos with proper licenses to avoid legal issues.
- Optimization: Optimize stock photos with descriptive filenames and alt text.
- Uniqueness: Customize stock photos to make them unique to your website.
- Quality: Use high-quality stock photos with precise resolution.
- Diversity: Mix stock photos with original and user-generated content for variety.
Keep these considerations in mind to effectively use stock photos for image SEO.