From past few years, you might hear “Google Fi” frequently because it is one of the trending next-generation cellular carriers powered by Google. Google has launched this next generation way back in 2015, but it has earned enormous craze and popularity in 2018 itself. Here the Google Fireplaces the project Fi and they are presently using the waves across the mobile industry. Let us know How to Setup Google FI on Your iPhone Perfectly in this blog post.
It has everything you need, as it provides phone calls, messaging, data services using both the Wi-Fi networks and cellular networks as well. Presently its mobile network is limited Sprint, t-mobile, U-S Celler. This Google Fi comes with super cheap plans just starting from $20, and it has the ability to connect through the millions of Wi-Fi hotspots around the globe. The Super cheaper rates are attracting lots of eyeballs towards Google FI.
Now, to make things more amazing, Google has announced officially that Google Fi support to iPhone. So, from now on you can setup Google FI on Your iPhone itself. You can even find a Google Fi official app in the iOS App store to know more about Google Fi.
How to Setup Google FI on Your iPhone Perfectly
Now, if you are wondering how to set up Google FI on Your iPhone correctly? Then don’t worry follow the below guide. In this article, I’ll let you know about the process of setting Google FI on Your iPhone. Although this process is somewhat tricky but I have tried the best to give you the perfect idea. So, make sure you follow the entire guide so that there will be no misconceptions.
Let’s get into the process of How to Setup Google Fi on your iPhone
-
Always Make Sure your iPhone is Carrier – Unlocked:
The first thing you need to do is check whether your iPhone is carrier unlocked or not? If your device is not a carrier, unlocked device means make that phone carrier unlocked. Here carrier unlock is also known as the SIM unlocked or GSM unlocked option. Now, to start your work you should make sure your phone is has a carrier unlocked or else it will just refuse to connect with the Google Fi Network even though it is capable of connecting with Google Fi.
So, if you brought your iPhone directly from the Apple store, then it will be unlocked. If you brought your iPhone with your carrier offer means you will probably have to unlock it and it will take some time to unlock thee types of devices.
-
-
Check out Google Fi’s Limitation on iPhone:
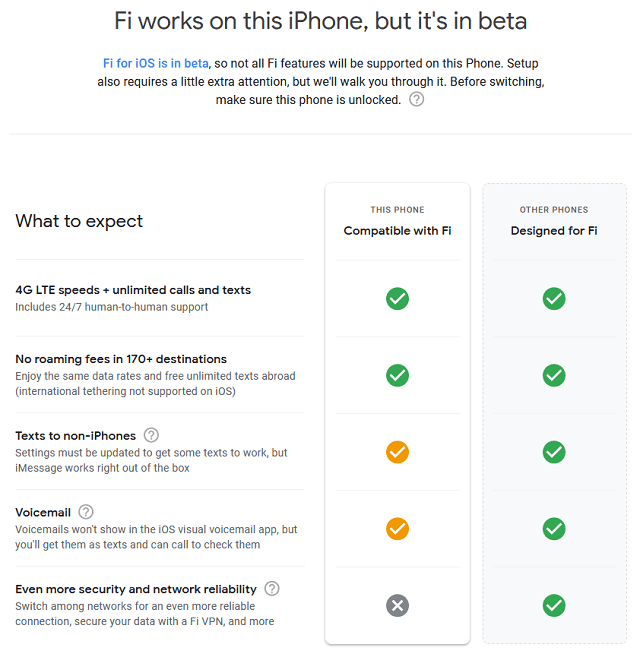
When you want to consider Google Fi you should know a few things. Firstly, iPhones are not capable of switching between Google Fi’s underlying networks like spirit, US- Celluar and t-mobile. So, instead of that, you will be only limited to the t-mobile network.
So, it is always best to check t-mobile’s coverage map when you are moving forward with the Google Fi. Make sure you check the coverage is perfect in your area or not? Or else you will get into the trouble. However, to make sure you get an exact representation of covered — Never click on the option “Extended Range LTE – 600 MHz” overlay because it can trouble you.
Set Back involved in Google FI on Your iPhone
Most of you might be concerned and worried about the different frequencies used by the US carriers. But frankly speaking, you shouldn’t be worried about it because all iPhones in which are sold in the US (Whether it is carrier locked or sold directly by Apple) all work on t-mobile frequencies. The only exception for this T-mobile’s new 600 MHz and Band 71 Network even iPhone purchased from this network won’t work on this network.
So, you’ll be getting same coverage with any USA iPhone on Google Fi as it has t-mobile coverage support. If your iPhone has lost a bit of functionality on Google Fi, then texting might not work over the Wi-Fi. Rather than that everything will be normal and will work the same. Wi-Fi calling and texting will not work either in this type of iPhone.
So, be wise to choose Google Fi’s limitation on your iPhone correctly. Along with these, you might love visual voicemail option by switching to the Google Fi. This is will surely change shortly, but presently you might face this problem.
-
Until now we have seen precautionary measures of iPhone.
Now, let’s get into the process of how to set up Google FI on Your iPhone.
-
Buy a project Fi, Sim Card:
After cross-checking your mobile, if you are interested in switching to the Google Fi, then you should have a new Google Fi SIM Card. To get this sim card all you need to do is sign up for the Google Fi program and then ensure that you choose “Bring your own phone” when you were asked to select a device. For this process, you won’t have to spend any amount on SIM kit and all.
-
After Getting SIM Install Google Fi:
Right now you have a Google Fi sim card in your hand. Now, you have to install Google FI app on your iPhone. You can get this app for free in your app store.
-
Start activating your Google Fi SIM:
As you installed the app, you should insert your Google Fi SIM card into your iPhone to start the activation process.
Process:
- Insert Google Fi SIM Card into your iPhone.
- Then Restart your device.
- Now, open the Google FI app.
- Sign in with your registered Google Account you used to Activate Google FI Sim.
- Just start following the steps which prompt to get your new network up and running.
-
Activate SMS & MMS Messages:
I already mentioned in step 2 about the overlays and messaging apps you might miss in some iPhone carriers. But for other, you should make sure your iPhone has enabled SMS & MMS messages.
For this, you need to tweak some settings.
Process:
- Head over to your settings page and open your settings.
- Click on the “Cellular” Menu.
- If you are using IOS 12, then click on “Cellular Data Network”.
- If you are using IOS 11 click on “Cellular Data Options,” then select “Cellular Data Network.”
-
Manually Enter the Codes:
After following that process, now you have to manually enter a few values in your iPhone fields. So, just copy the information below and enter into your iPhone.
LTE Setup:
- APN: h2g2
- Username: Leave This Place Blank
- Password: Leave This Place Blank
Cellular Data Manual Codes:
- APN: h2g2
- Username: Leave This Place Blank
- Password: Leave This Place Blank
MMS Manual Codes:
- APN: h2g2
- Username: Leave This Place Blank
- Password: Leave This Place Blank
- MMSC: http://fi.g.co/mms/wapenc
- MMS Proxy: Leave This Place Blank
- The MMS Max Message Size: 1048676
- MMS UA Prof URL: apple.com/mms/uaprof.rdf
After you have manually entered these details; just restart your iPhone. Then use your fully activated Google FI on Your iPhone.
Conclusion
Most of the people still confused whether to take the Google FI on Your iPhone or not. For all of them, in my opinion, Google Fi is best for adaptable and unlocked iPhone devices. Because it is the very cost effective network you will find in the US. If you strive to save some money on your network then you should be using this Google Fi. Rest is up to you, I hope you all have set up you iPhone based on the above steps.


