Ready to jump the ship to iOS! Here is everything you need to know How to transfer data from android to iPhone. Start migrate your existing data from Android to iPhone!
Switching from one Android device to another is child’s play. However, if you happen to make a move to Apple’s walled garden, things can get a bit dicey because, as all of you are aware, Android and iOS are two fundamentally different operating systems. Plus, Google and Apple don’t exactly see eye to eye.
If you have recently got yourself an iPhone and plan dailying it, odds are you’re looking for the easiest method to migrate. Thankfully, there are a couple ways you can transfer data from Android to iPhone, and this guide will walk you through the most common ones, starting with the Move to iOS app.
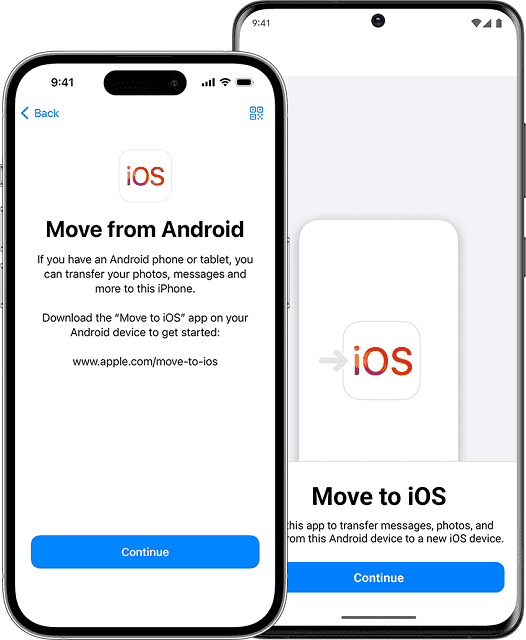
How to Transfer Data from Android to iPhone Using “Move to iOS”
Move to iOS is among the few Android apps Apple has on the Play Store, promising users an easy, secured way to transfer their content to an iPhone. This includes photos and videos, contacts, messages, calendars, mail accounts, and even WhatsApp content.
The newest version of the app (4.0.1 at the time of writing) is compatible with devices running Android 6.0 Marshmallow and above, making the migration process to iOS slightly more convenient.
But before we get to the steps, here are a few things to do before you begin:
- Toggle on Wi-Fi on your Android device, and make sure it’s close to your iPhone.
- Place both your iPhone and Android to charge. We recommend starting the migration process with a higher battery level on both, as it may take a while to complete depending on how much data is being moved.
- Check whether the content you are planning to transfer will fit on the iPhone or not. Otherwise, figure out what moves to your new device, what doesn’t, and what to store in a separate drive. It includes any files you may have on the microSD card plugged into your Android device.
- Get the Move to iOS app from the Play Store on your Android phone.
- If you don’t have access to the Play Store or have a device running an older version of Android, you can download the APK file directly from this Apple Support page and sideload it.
Ready to make the move? Simply follow these steps:
- Power on your iPhone if you haven’t already, keeping it close to your Android device. You’ll soon be greeted by the startup screen of the Setup Assistant, one that says “Hello” in various languages.
- Proceed through the initial on-screen prompts, which usually involve connecting the iPhone to your Wi-Fi, setting up a passcode, and accepting Apple’s T&C.
- You should eventually reach the “Quick Start” screen as it looks for other Apple devices nearby. Since you have an Android, tap Set Up Without Another Device at the bottom.
- Once you find yourself on the “Transfer Your Apps & Data” screen, tap where it says “From Android”. Don’t tap Continue just yet, as you need to put down the iPhone and move to your Android device.
- Launch the Move to iOS Android app. Tap Continue on the first screen, followed by agreeing to Apple’s terms and conditions. Make sure to give the app Location, Notification, and all other necessary permissions when prompted.
- Tap Continue on your iPhone screen. The following screen will ask you to enter a six-digit one-time code on your Android device.
- Enter the code in the Move to iOS app. At this point, your iPhone will create a temporary Wi-Fi network. Tap Connect to proceed, and wait for the “Transfer Data” page to show up.
- On your Android, choose the content you want to transfer (e.g., camera roll, accounts, contacts, messages, calendars, web bookmarks), then tap Continue.
That’s it! The transfer process should now begin. If your iPhone goes to sleep, don’t worry – the transfer’s still happening in the background.
We also suggest leaving both devices alone until the progress bar reaches 100%. As mentioned earlier, the whole process can take a hot minute depending on the size of the content moved.
Upon successful transfer, tap Done in the Move to iOS app on your Android phone, and continue following the rest of the on-screen instructions on your iPhone to finish setting it up.
Wondering how to transfer data from Android to iPhone? Our step-by-step guide makes switching devices seamless. Further you don’t lose any valuable data!
How to Transfer Data from Android to iPhone Using iTunes on Computer
Let’s say Move to iOS didn’t work out for some reason. Or even if it did, you may notice that the music, document files, or PDFs you have had on your Android phone didn’t move over to your iPhone. In that case, you’ll have to bring them over manually using a PC or Mac. Here’s how it goes:
- First, connect your Android phone to your PC or Mac using a USB cable.
- Bring down the notification shade on your device and tap the “Charging this device via USB”
- Next, choose File transfer under the “Use USB for” It’ll make your Android device’s storage visible to your computer.
- If you’re on Windows, navigate to your Android device’s internal/external storage drive from File Explorer, and copy over the necessary files to a new folder on your PC, wherever you may find it convenient.
- If using a Mac, install the Android File Transfer app (READ BELOW), launch it, and then go to Documents, Music, or any other category for the type of files you want to transfer.
| At the time of writing, Google has stopped offering the Android File Transfer app for macOS on the official site: www.android.com/filetransfer for reasons unknown.
However, we’ve used the Wayback Machine to find this direct download link to the last available version of the app hosted on the website. If you don’t trust installing this .dmg file on your Mac, consider checking out OpenMTP, a free, open-source alternative available for both Apple Silicon (M1 and above) Macs and the legacy Intel-powered models. |
- When you’re done copying the files, disconnect your Android device, and plug your iPhone into the computer using a USB-A/C to Lightning/USB-C cable.
- On your iPhone, tap Allow to give your computer access to its files.
- On a Windows PC, download and open the Apple Devices If using a Mac, launch iTunes, then click on the name of your iPhone.
- If you want to transfer your music, head to the folder where you put the files, select them all and drag them to the Music tab in the Apple Devices app or iTunes Library. The same goes for Books (ePubs and PDFs), Photos, Files, etc.
- Choose what to sync, click Done, followed by Apply. It may take a couple of minutes to over an hour for the iPhone to sync depending on how many files you’ve selected.
Frequently Asked Questions:
What about my apps? Do they transfer too?
If available on both the Play Store and the App Store, some of the apps you use on your Android device (the exception being any paid ones) will also transfer, but you’ll have to download them manually.
On your iPhone, head over to the App Store from the Home Screen, and you should be able to download those apps!
Should you not get the option, go to the Search tab, find the apps you used on your Android phone, and install them.
Can’t proceed with the transfer, How to fix it?
If the transfer fails immediately or several minutes into the process, relaunch the Move to iOS app on your Android phone and repeat the above steps. Some users also recommend restarting both devices before giving it another try.
Additionally, toggle off any “Smart Network Switch” or “Dual Network Acceleration” setting on your Android phone as it’s known to cause issues with data migration. Keep only Wi-Fi on and turn off your mobile data connection during the entire process.
Again, DO NOT USE your devices with the transfer taking place. Switching to another app on the Android device will interrupt the connection. Keep your phone on DND (Do Not Disturb) until the transfer finishes.
I’ve already set up my iPhone. Can I still use the Move to iOS app?
No, once you’ve finished going through the initial Setup Assistant wizard, you won’t be able to use the ‘Move to iOS’ app to transfer your stuff. The best approach would be to erase your iPhone and then use the Android app for the migration.
If you plan to do so, back up any important data on your iPhone before resetting it so that you can restore it afterwards. Alternatively, check out the following section to move your files in the good ol’ fashioned way.
Can I access my Google Drive and Photos from my iPhone?
Rest assured, all the files on your Google Drive and personal media synced to Google Photos are accessible from your iPhone. Here’s what you have to do:
- Download the respective Google apps from the App Store.
- Launch the app(s) from the Home Screen and sign in with your Google account.
- You can now access your media, documents, and all other files synced to Google Drive or Photos! Similar to Android, you can choose to save/download select files for offline access.
The same applies to Dropbox, OneDrive, or any other cloud storage service you use. Apple also offers their own known as iCloud Drive, with a free 5 GB storage limit for starters.
For photos and videos captured on the iPhone, you may use iCloud Photos to sync them to the cloud, which you can then access from any device you own.
And what about other services?
When you add your mail accounts to your Apple device, be it Google, Microsoft, or Yahoo, you can choose to sync them with the Mail, Contacts, Calendars, and Notes apps. Head to your iPhone’s Settings app > Mail Accounts > Add Account and sign in with any of the available options.
Similarly, if you use a streaming music app like Spotify, Amazon Music, or TIDAL, get it from the App Store and sign in with your credentials to access your playlists. Of course, Apple Music is also there!
Can I use a flash drive to transfer data from Android to iPhone?
Yes, you can, but you may need one of those double-ended flash drives or a certified OTG adapter that plugs into your iPhone’s USB-C or Lightning port.
Some vendors like SanDisk and Kingston even offer their own apps to import and export files to and from an iPhone seamlessly.
Time to Move On!
Now that you know how to transfer data from Android to your iPhone, switching over to iOS shouldn’t feel any harder. Once your content is migrated, you’re ready to get going!
While we’ve outlined two effective methods to migrate most of your stuff to your Apple device, many third-party apps promise to simplify the process. However, we’re typically against using those for privacy concerns.
Still have some doubts to clear? Shoot your questions in the comments!


